


 Jun 17, 2026
How do I get started with TeemDrop POD?
A simple guide for TeemDrop customers to personalize POD products, list them to the store, and check the buyer experience before launch.
| Who this is for | TeemDrop customers who want to offer personalized POD products in their store. |
| What you will do | Choose a POD 2D product, add simple personalization options, list it, and test the buyer flow. |
| Main goal | Customers can upload images or enter text, preview the product, and complete checkout smoothly. |
| Before Listing | Always test the product page, preview, cart, and checkout once before sharing the product link. |
I. Before You Start
- Prepare your product images and the design materials you want customers to personalize, such as text, photos, or style options.
- Check that the product information is ready, including product name, images, variants, price, and shipping details.
- If you want to publish the product to Shopify, make sure the product has been approved in TeemDrop first.
|
How to read the screenshots? Follow the red boxes and numbers in each screenshot. They show where to click or what to check in the current step. |
II. Create the Personalized Design Template
1. Choose the POD 2D product you want to design
- Go to POD Products and select the POD 2D product you want to work on.
- Open the product details page and click "Design". This will take you to the 2D Product Editor.
2. Open the editor and check the design area
- When the editor opens, check the product image and the dashed box on the canvas.
- Use the Front and Back buttons to switch between sides if your product supports more than one side.
- Use the left panel to add customer personalization options, such as Text, Image Upload, or Image Group.
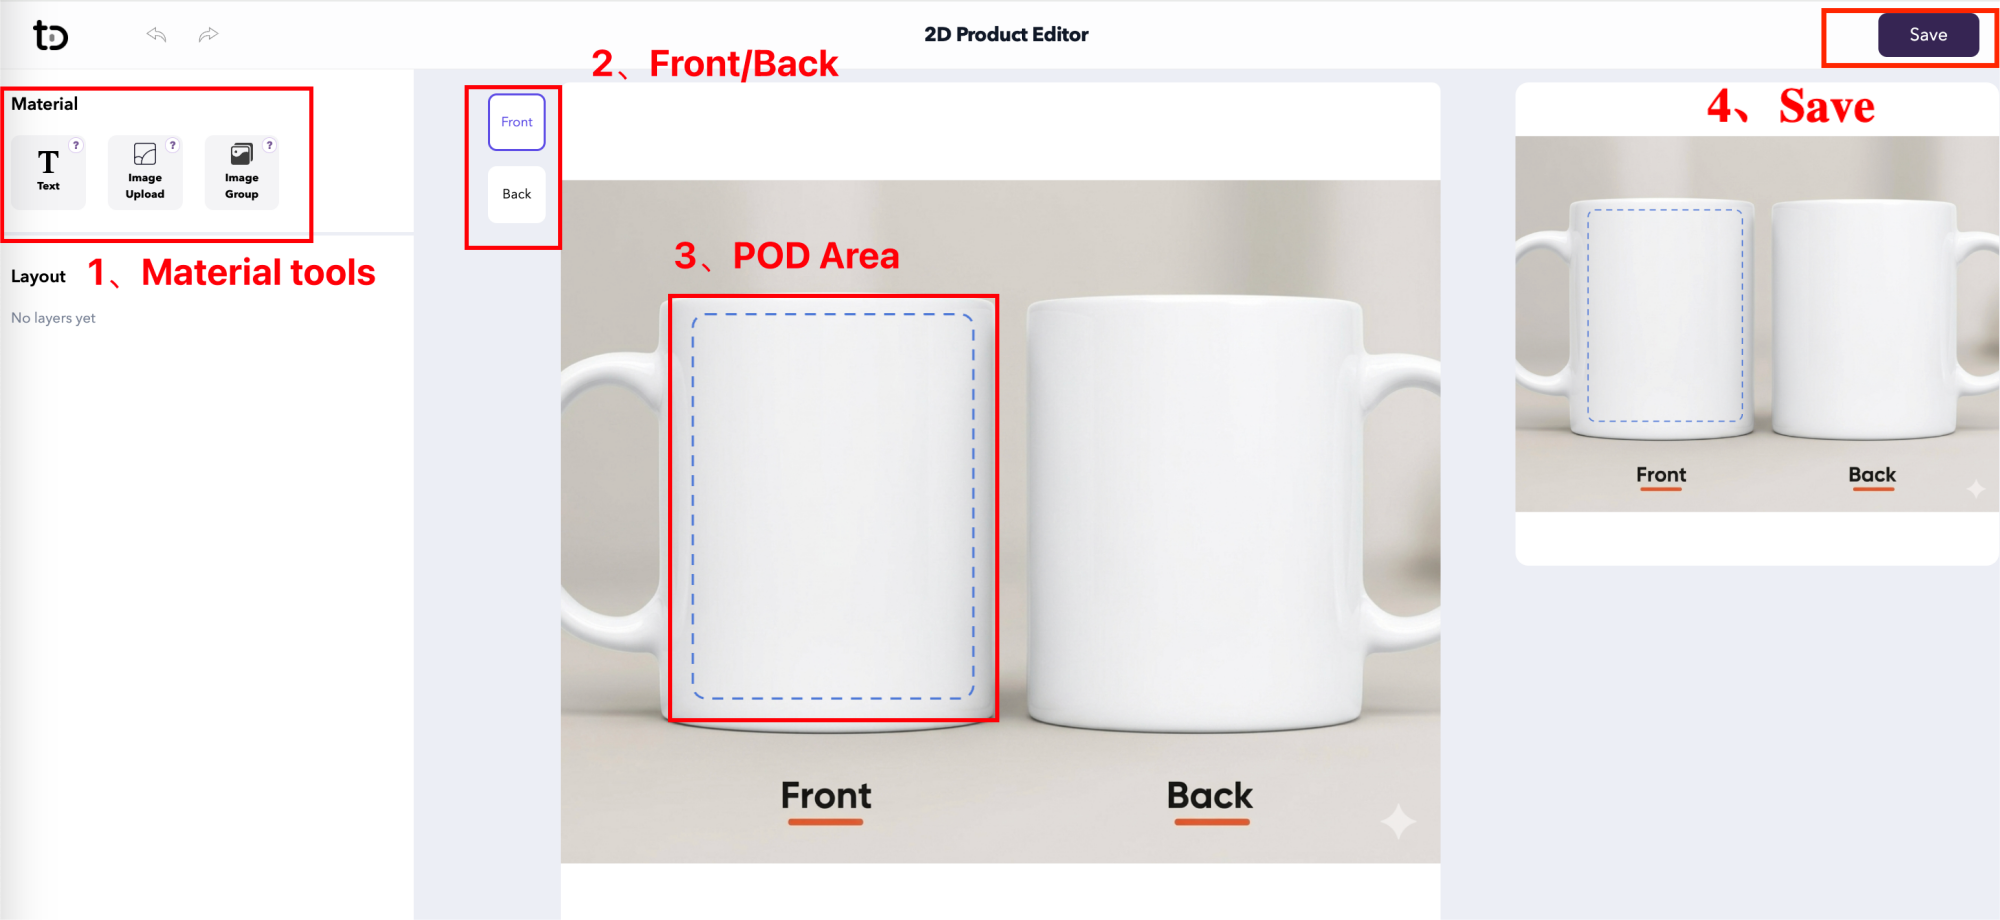
Figure 1: Open the editor and check where customers can personalize
3. Add text or image upload options
- Click "Text" if customers should enter words, names, or short messages.
- Click "Image Upload" if customers should upload their own photo or image.
- Place each item inside the dashed area so it appears correctly in the final preview.
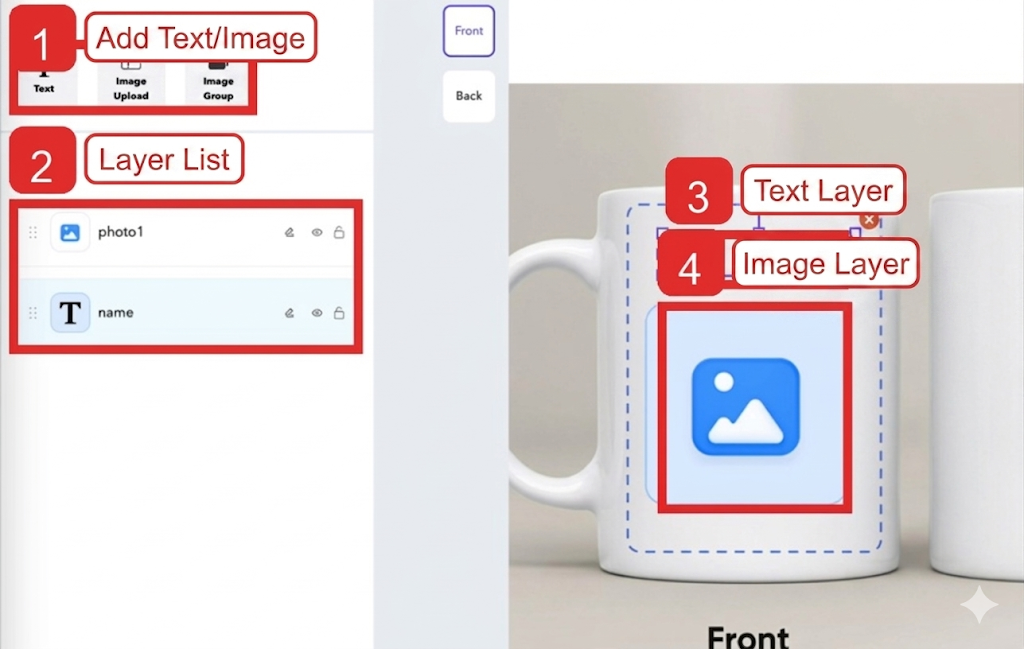
Figure 2: Add text and image options to the product
4. Set up the back side or image choices
- Click "Back" if the product also needs a design on the back side.
- Use Image Group if customers should choose from several preset images or styles.
- Adjust the position, size, and rotation to the area where you want end customers to personalize the product.
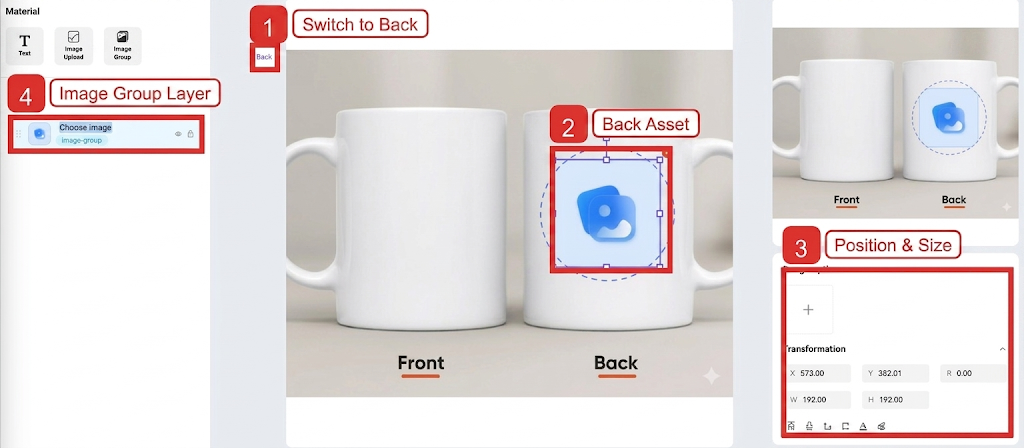
Figure 3: Set up back-side design or image choices
5. Preview and save the design
- Click each text or image item and check that the sample content, size, color, and position look correct.
- Review the front and back sides, then click "Save".
- Before saving, make sure all design elements stay inside the dashed area to avoid cropping.
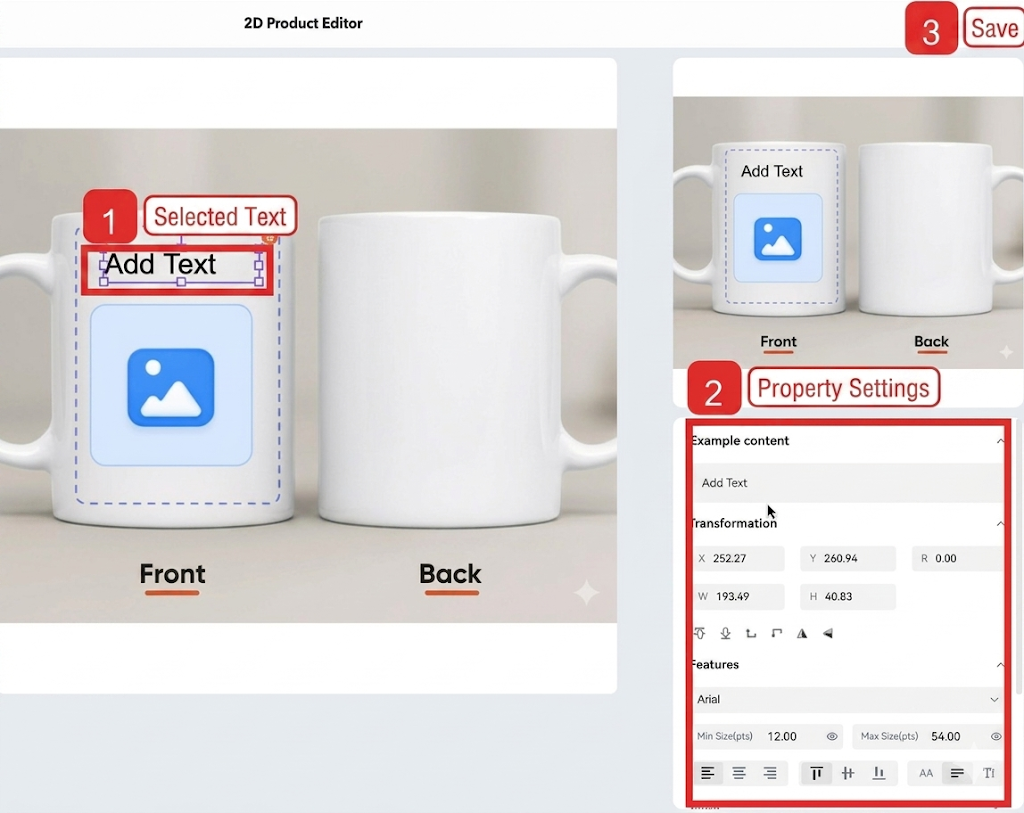
Figure 4: Check the settings and save the design
III. List the Product and Check the Storefront
6. List the approved product to your store
- In TeemDrop, go to POD > POD List.
- Find the approved product and click "List to Store".
- Wait for the listing status to update. The system may show "Listing in progress" while it is publishing.
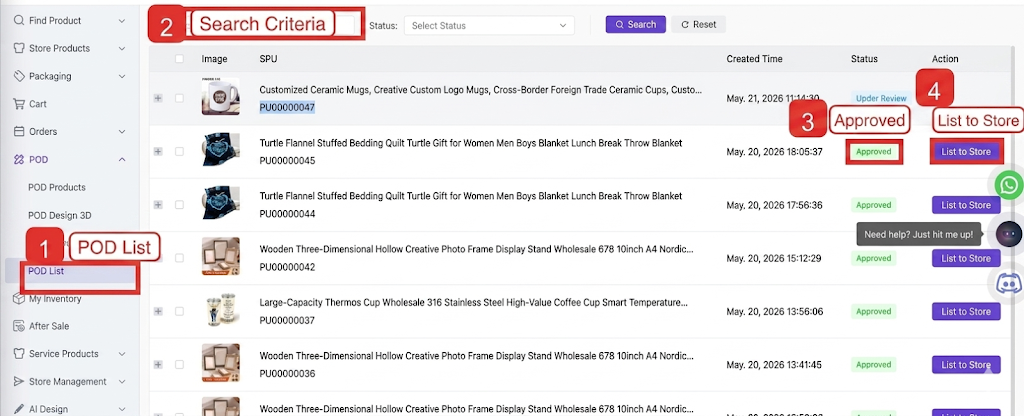
Figure 5: List the product to your store
7. Enable the Design 2D feature in Shopify
- In Shopify admin, open the product page template or theme editor.
- Find the product template used by this item.
- Add the Design 2D plugin/block and save your changes.
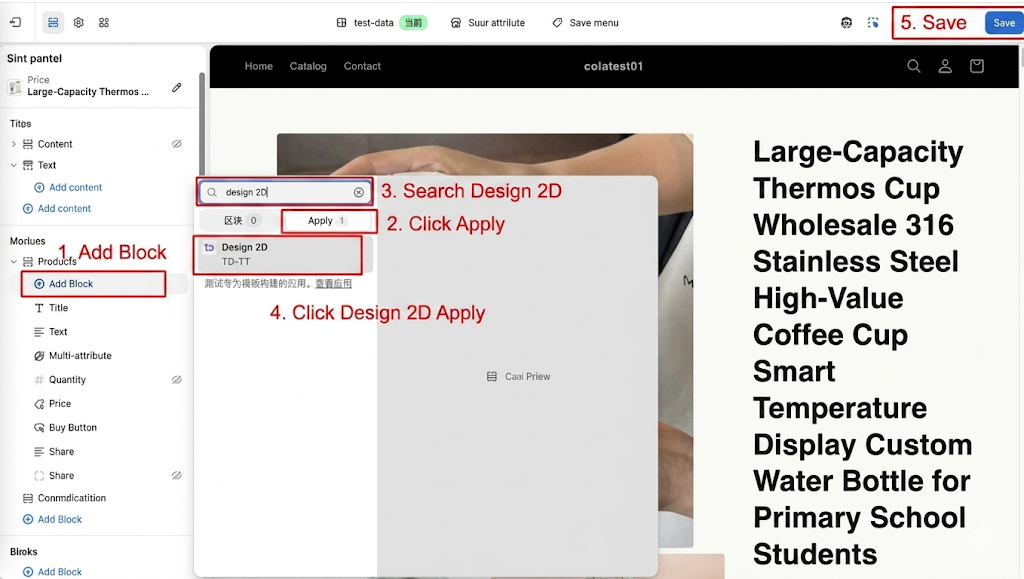
Figure 6: Add the Design 2D feature and save
8. Check the product in your store
- Open your Shopify catalog or the product page.
- Check that the product image, title, price, and variants are shown correctly.
- Open the product page and make sure the personalization section appears.
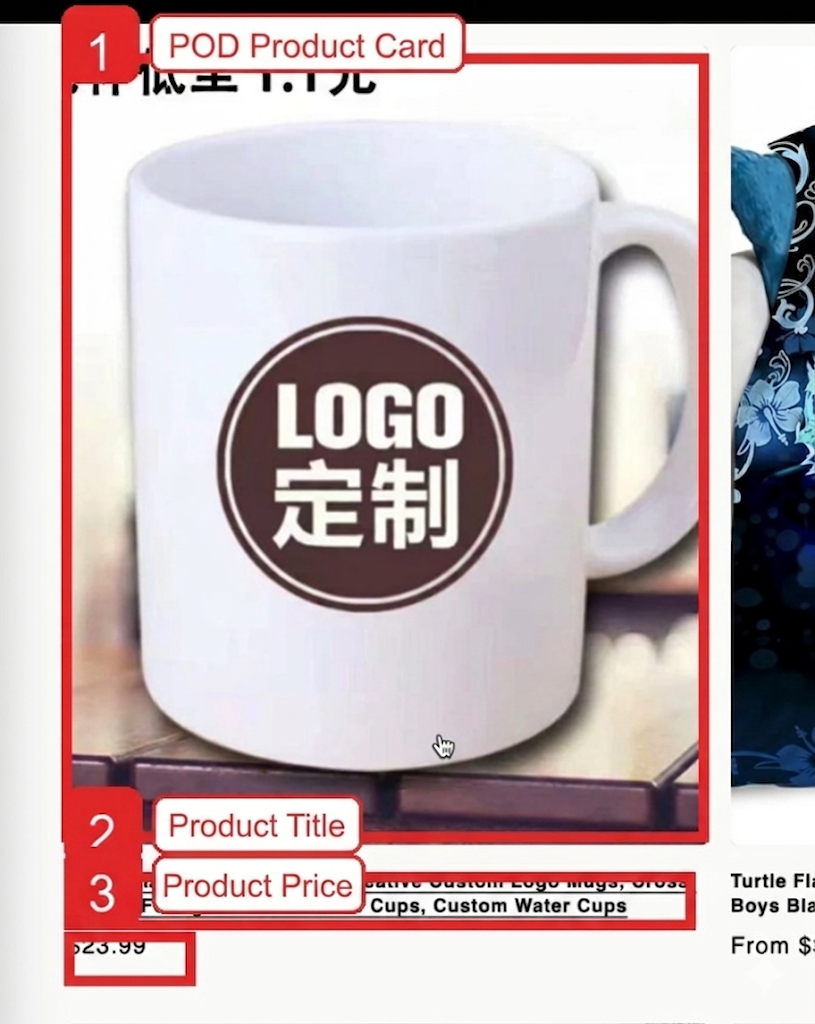
Figure 7: Check the product in the storefront
9. Test the buyer personalization flow
- Choose a product option, such as color or capacity.
- Upload a test image or enter sample text in the personalization section.
- Click "Preview your personalization" and check that the preview looks correct.
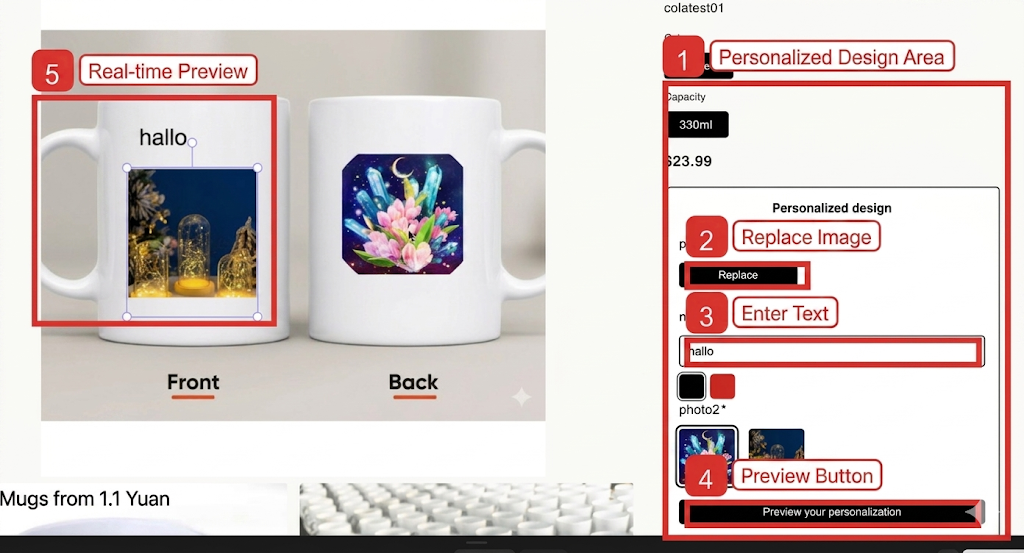
Figure 8: Test personalization on the product page
10. Check cart and checkout
- After previewing the design, add the product to cart and go to checkout.
- Check that the product option, price, thumbnail, and personalization preview information are correct.
- Once everything looks correct, the product is ready to share with customers.
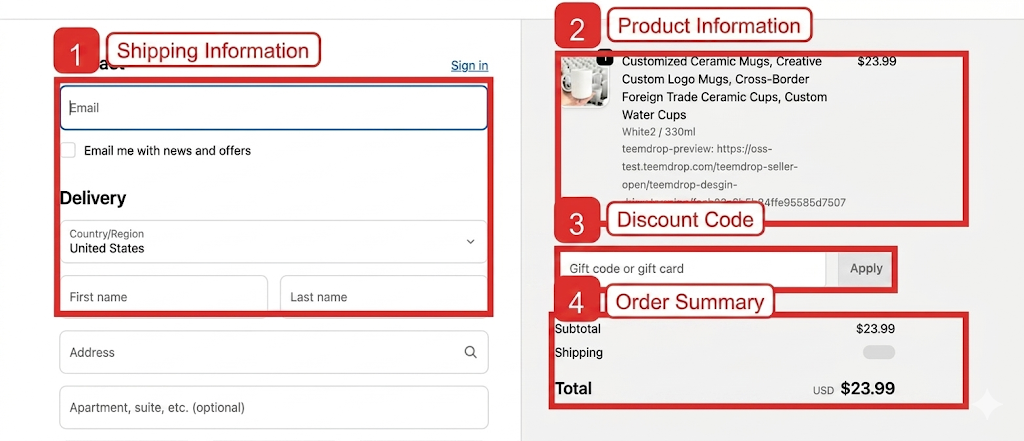
Figure 9: Check the personalized product at checkout
IV. Quick Launch Checklist
- The design items stay inside the dashed area in the 2D editor.
- The product page lets customers upload images, enter text, and preview their design.
- Cart and checkout show the correct product option, price, and personalization information.
V. Common Questions
| Question | Simple answer |
| Why can't I click "List to Store"? | The product usually needs to be approved first. Go back to the POD list and check the product status. |
| Why can't customers see the personalization section? | Check that the product is a POD product, it has been listed to the store, and the Design 2D plugin/block is enabled in Shopify. |
| Why is my image or text cropped in the preview? | Go back to the 2D editor and move the item fully inside the dashed area. Then save and test again. |
| Do I need to test before sharing the product link? |
Testing is not required, but we recommend it. You can test upload, text entry, preview, cart, and checkout once so customers have a smooth experience. |
